
3D embroidered designs open a realm where fabrics come alive with texture, depth, and tactile appeal. These effects are achieved through layering stitches, padding, and careful stitch placement—hallmarks of layered stitch embroidery and 3D embroidery techniques. From jackets to cushions, the technique adds dimensional pop and a textured fabric embroidery feel that invites touch. Beginners can start with simple padded petals or letters, then graduate to more complex layering stitches on fabric. Exploring 3D embroidery ideas expands your craft toolkit and elevates projects with a distinctive, touchable charm.
In other terms, these designs can be described as raised embroidery or dimensional stitching that lifts motifs from the base fabric. Think of sculpted textiles, fabric relief, or textured surface art where padding and layered threads create tangible depth. People search for ideas using phrases like volumetric embroidery, puff stitching, and stitched relief to discover related techniques. By using these LSI terms, you connect 3D embroidery ideas with broader topics such as embellishment trends, sustainable fabric art, and hands-on craft projects. Whether you call them raised motifs or layered 3D textures, the core concept remains the same: height, texture, and careful planning.
Frequently Asked Questions
What are 3D embroidered designs and how does layered stitch embroidery create their raised effect?
3D embroidered designs are motifs that sit above the fabric surface, built by padding and stacked stitches. Using layered stitch embroidery and careful stitch placement—along with padding behind satin stitches—creates height, depth, and texture that make petals, letters, or geometric shapes pop from the fabric as part of textured fabric embroidery.
Which 3D embroidery techniques are most effective for building dimension?
Effective 3D embroidery techniques include padded satin stitches, couching with multiple threads, bullion and stem stitches, and layering seeds or French knots. These methods, all part of layering stitches on fabric, build dimension and a tactile, raised look in 3D embroidered designs.
How can I apply 3D embroidered designs to clothing or accessories?
Start with a simple motif, outline it, then add padding behind raised areas and build multiple layers with satin and textured stitches. This approach uses layering stitches on fabric to create dimensional accents on jackets, bags, hats, and other accessories.
What materials do I need to begin creating 3D embroidered designs?
Choose a stable base fabric (like cotton, linen, or denim) with an appropriate stabilizer, plus padding (batting or felt), polyester or rayon embroidery threads, a sharp needle, hoop, scissors, and marking tools. These essentials support effective textured fabric embroidery and the construction of 3D embroidered designs.
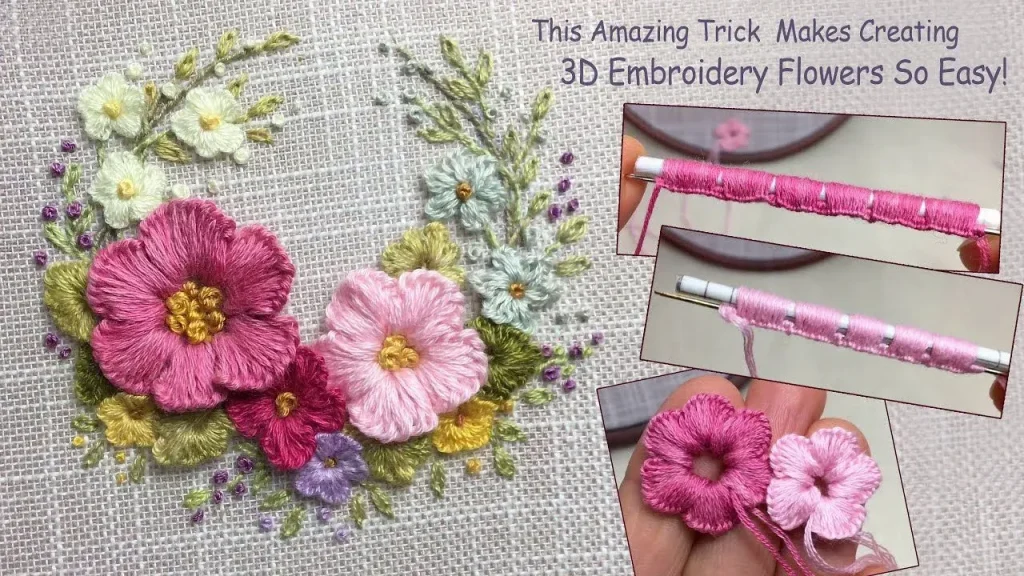
What are some beginner-friendly 3D embroidery ideas to try first?
Try floral motifs with padded petals, dimensional lettering, and simple geometric shapes with concentric raised layers. These 3D embroidery ideas introduce layering stitches on fabric and the basic concepts of 3D embroidered designs.
How should I care for 3D embroidered designs to preserve height and texture over time?
Care for 3D embroidered designs by washing gently in cold water, turning the garment inside out, and air-drying. Iron on the reverse side if needed and store flat or rolled to protect padding. Proper care helps maintain the layered height and texture of 3D embroidered designs.
| Aspect | Key Points |
|---|---|
| Definition of 3D Embroidered Designs | Raised surfaces created by deliberate layering of stitches, padding, and careful placement; planes pop from the base fabric unlike flat embroidery. |
| Layered Stitch Techniques | Key methods include padded satin stitches, couching with multiple threads, bullion/stem stitches, seed/ French knots, and puff/padding layers to build dimension. |
| Tools, Materials, and Preparation | Stable base fabric (cotton/linen/denim), suitable stabilizers, polyester or rayon threads, padding (batting or felt), needles, hoops, scissors, markers, and protective tools. |
| Planning & Design | Sketch motifs, plan which areas will be raised, estimate padding height, consider light/shadow on raised surfaces, and test on scrap fabric. |
| Step-by-Step Motif Creation | Prepare fabric and stabilizer; outline base; add padding behind raised areas; build up layers; stitch first layer; finish with texture; secure and trim. |
| Practical Design Ideas | Floral bouquets with layered petals, geometric abstracts with raised concentric shapes, dimensional lettering, animals with raised features, seasonal motifs emphasizing texture. |
| Applications | Apparel (jackets, pockets, cuffs), accessories (bags, belts, scarves), home decor (cushions, throws), and quilts/wall hangings. |
| Care & Maintenance | Gentle washing, turn inside out, air-dry, iron from reverse side if needed, and store flat to protect padding. |
| Common Mistakes & Prevention | Avoid over-padding, ensure consistent padding, maintain fabric tension, and choose suitable weight threads to prevent flattening or distortion. |
| Key Outcomes | Depth, tactile appeal, and versatility across fabrics emerge when layering stitches, padding, and planning are balanced. |
Summary
Table of key points about 3D embroidered designs.