
3D embroidered florals transform fabric into a living surface, inviting touch as petals seem to lift from the cloth, revealing subtle shadows and depth for beginner and experienced stitchers alike, with this approach allowing customization of scale from delicate trims to bold botanical statements. With layered petals and careful color shifts, this technique showcases how 3D embroidery can add scope and drama to garments, cushions, and décor, while remaining versatile across fabrics and project sizes, and offering adaptability from tiny trims to large wall pieces. The puff stitch flowers used in these designs create natural curves and dimensional volume, mimicking the softness of real petals and inviting a tactile response from viewers, while encouraging experimentation with petal shapes and overlaps. Choosing harmonious threads and controlled shading supports textured embroidery, giving petals a tactile, lifelike surface that catches light from different angles while maintaining balance in larger compositions, and guiding practice toward consistent tension and spacing. Whether you’re embellishing clothing or home accents, these techniques invite you to experiment with layering, color blending, and thoughtful placement to achieve believable botanical drama and durable, hand-crafted results.
In other words, these methods build dimensional botanical motifs through raised stitches and careful color transitions that lift petals off the fabric and create the impression of a living garden. Designers often describe this as dimensional stitching or volume embroidery, using layered loops, shading, and texture to imitate natural light on petals. The approach also adapts to different materials and project scales, from subtle accents on clothing to larger installations in home decor, inviting playful experimentation with contrast, finish, and mixed media.
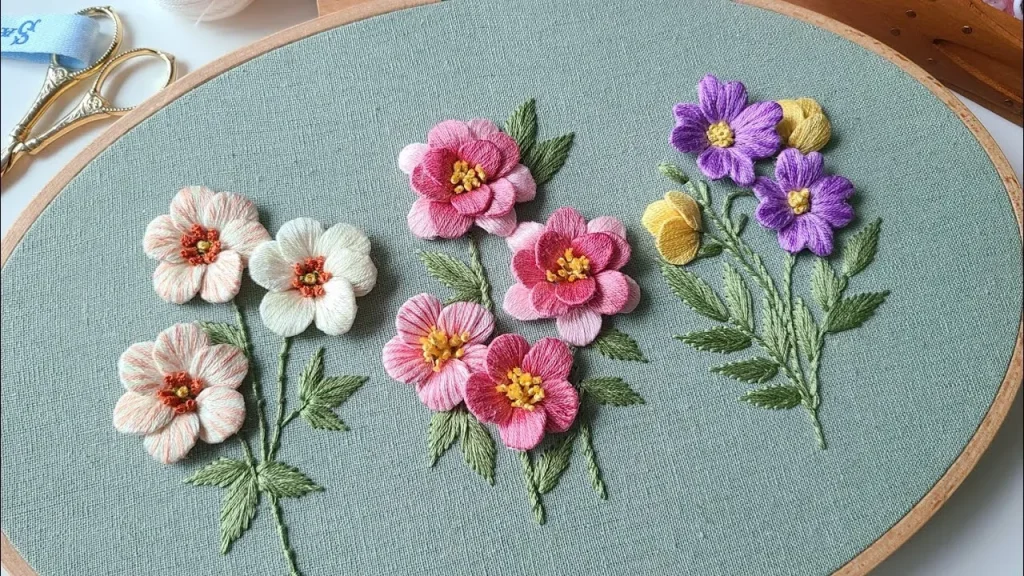
3D Embroidered Florals: Foundations of Puff Stitch Flowers and Realistic Blooms
3D embroidered florals transform flat fabric into a tactile garden by layering petals, stacking puff stitch flowers, and applying subtle color shifts. In this approach to 3D embroidery, each puff adds volume, and carefully planned layering yields lifelike petals that catch light and shadow. This technique sits at the heart of floral embroidery techniques and is especially effective for realistic blooms embroidery when you want dimension that flat stitches cannot achieve.
Begin with a small palette of petal colors and practice building petals from the center outward. By varying the height of puff stitches and adjusting the angle of each layer, you create a natural bloom silhouette. Incorporate light-to-dark shading within petals and along edges to mimic the way real petals curve away from the center, a hallmark of textured embroidery.
Color Blending and Shading for Realistic Blooms in Textured Embroidery
Shading and color blending are essential to convincing realism in 3D floral work. Start with a soft base shade and introduce mid-tones toward the petal center, then edge-darken toward the tips to emulate natural light play. Using variegated threads or two-tone blends within a single petal creates subtle color transitions that read as natural variation in realistic blooms embroidery.
Coordinate hues with the fabric under your project so the bloom harmonizes with the background. Plan color transitions across layers, not just within a single petal, to maintain depth. The result is textured embroidery that feels alive, with petal rims catching light and inner folds forming gentle shadows.
Layering Puff Stitches: Building Depth in Petal Clusters
Layering puff stitches is the fastest route to a multi-petal bloom. Place several puff stitches in a cluster to form each petal, then offset subsequent layers to mimic natural petal overlap. This layering strategy is a common technique in floral embroidery techniques and creates a three-dimensional silhouette that reads clearly from a distance and up close.
To increase depth, vary the stitch length and direction between layers, and weave in a secondary thread color for shading. Center layers can be more compact, while outer petals spread wider, producing a windswept, organic look. This approach aligns with textured embroidery principles, offering tactile interest and a believable bloom form.
Fabrics, Stabilizers, and Tools for Durable 3D Florals
Selecting fabrics and stabilizers is foundational for durable 3D florals. Lightweight cottons and linen provide a stable base for puff stitches, while stabilizers—from tear-away to water-soluble—prevent distortion on delicate textures. This choice supports the long life of 3D embroidery projects that showcase puff-stitch flowers.
Choose threads that balance opacity and shading, such as cotton or silk variations, and use appropriate needles and hoops to maintain stitch roundness. A stabilized foundation keeps layers crisp as you add more petals, ensuring that the textured embroidery maintains its lift and shape over time.
Planning and Transferring Floral Patterns on Garments and Home Decor
Pattern planning and transfer are critical steps before stitching any 3D floral design. Sketch your bouquet layout, decide how many blooms and petal layers you want, and map petal placement with light guidelines. Accurate transfer tools and technique—such as tracing pens or wash-away pens—help you maintain consistent puff-stitch positions across garments or cushions and wall art.
Think about garment placement or decor context when designing. Scaling blooms, choosing the number of layers, and aligning blooms with seams or borders all influence the final impression. By approaching the project with floral embroidery techniques in mind, you ensure that puff stitch flowers read as intentional, not accidental, additions to the piece.
Finishing, Care, and Longevity of 3D Embroidered Florals
Finishing techniques seal the look of 3D embroidered florals and protect the work. After stitching, gently shape petals and allow layers to settle before pressing with a cloth on a low heat. Use a mild detergent and cold water for care, and consider storing pieces flat to prevent flattening of raised petals over time.
Maintenance extends the life of the work, particularly when incorporating 3D embroidery into daily-use items like cushions or garments. Air drying is preferable to machine agitation, and occasional light re-shaping helps keep the bloom dimensional. With mindful care, your textured embroidery of puff stitch flowers remains vibrant and lifelike for years.
Frequently Asked Questions
What are 3D embroidered florals and why are puff stitch flowers effective for creating dimensional blooms?
3D embroidered florals layer petals and colors to lift from the fabric. The puff stitch creates rounded, voluminous petals, and stacking these stitches with careful color blending yields realistic blooms embroidery with tactile depth.
What fabrics, stabilizers, and threads work best for 3D embroidery of floral motifs?
Choose light- to medium-weight cotton, linen, or stable blends. Use tear-away or water-soluble stabilizers under the embroidery to prevent distortion. Threads like cotton floss, perle cotton, or silk, with subtle shading colors, produce effective textured embroidery for blooms.
How can I shade petals to achieve realism in 3D embroidered florals?
Plan layered shading: start with a light base, then mid-tones, and deepen toward the base. Use variegated or paired thread colors to simulate natural petal variation, with lighter tips to mimic light catching.
What are the key puff stitch techniques for creating textured petals in 3D embroidered florals?
Basic puff stitches build small rounded buds. Layer several puff stitches close together for petals, offsetting them to form overlapping layers. Within petals, blend colors and add seed stitches at the center to increase realism.
What finishing steps help keep 3D embroidered florals looking fresh over time?
Stabilize the fabric during stitching to maintain puff shapes. After washing, reshape petals gently and press with a cloth on low heat. Store flat and avoid heavy stacks to preserve dimension.
What is a simple project outline for a 3D embroidered floral on a cushion or garment?
Plan a single bloom or small bouquet. Stabilize fabric and lightly sketch placement. Create a tight center, build the first petal layer with puff stitches, then add shading and more petals, finishing with light edge highlights. This aligns with floral embroidery techniques to achieve realistic blooms embroidery.
| Topic | Summary |
|---|---|
| Purpose | 3D embroidered florals add dimension and lifelike charm to textiles by layering petals and shading with puff stitches. |
| The Puff Stitch | Creates rounded, raised petals; layering and color shifts mimic natural petals and bloom silhouettes. |
| Core Techniques | Basic puff stitch; Layered puff stitches; Shaded petals; Center accents for realistic centers. |
| Materials & Tools | Fabric (cotton/linen), stabilizers (tear-away or water-soluble), threads (cotton/perle/silk), needles (size 7–9), hoop/frame, pattern/transfer tools. |
| Color Choices | Base color with shading tones, variegated threads, center contrast, and lighter edges to simulate light and curvature. |
| Step-by-Step Approach | Plan bloom; prepare fabric; create center; build petals; add shading; layer more petals; finish edges; secure and press. |
| Texture Techniques | Mixed stitches with satin, color blending, petal shaping, highlights and shadows to add depth. |
| Beginners & Practice | Start simple (daisy/camellia), practice on swatches, stabilize fabric, manage thread length for neat back. |
| Projects & Applications | Home decor, apparel, accessories, gifts, and mixed-media crafts featuring puff-stitch florals. |
| Care & Longevity | Air dry or gentle wash, mild detergent, reshape after washing, store flat to prevent crushing. |
| Common Mistakes | Over-tight tension, too much stuffing, uniform arrangements, and abrupt shading transitions. |
| Inspiration & Next Steps | Practice with a single bloom, then expand to larger bouquets and multi-layered compositions, observing nature. |
Summary
Conclusion: 3D embroidered florals transform fabric into a living garden. By leveraging puff stitch techniques, careful color shading, and thoughtful layering, you can craft blooms that feel realistic and tactile. The journey from a flat stitch to a dimensional blossom is one of experimentation, patience, and a willingness to explore shading, texture, and composition. Whether you’re making a decorative panel, a wearable accent, or a keepsake, these skills empower you to create blooms that are not only beautiful but truly lifelike.