
3D Embroidered Hoop Art, also described as 3D embroidery hoop art, invites you to discover texture and depth in wall decor, transforming a simple hoop into a focal point. This craft blends traditional stitching with layered padding to create pronounced dimension and tactile appeal, a true example of DIY embroidered hoop art. With careful planning, it becomes textured wall decor that catches light and invites a closer look, a true embroidery hoop wall decor piece. From color choices to backing fabrics, the project stays approachable for beginners while offering professional-looking results. Whether you’re decorating a living room or a cozy study, this technique adds personality and handmade charm to any space.
Beyond the signature raised forms, this three-dimensional textile art uses layered fabrics and padding to lift motifs from the base fabric. Think of it as stitched relief on hoops—textured wall hangings that blend color, shadow, and light for adaptable home decor. LSI-friendly terms include fabric sculpture, raised embroidery, and hoop-based sculpture that anchor a room’s design while remaining approachable for crafters. By varying stitch types, padding, and fabrics, you can achieve a professional look that still feels handmade. When you describe your project using related concepts like DIY embroidery on hoops, textured surfaces, and decorative wall pieces, search engines connect readers to your content.
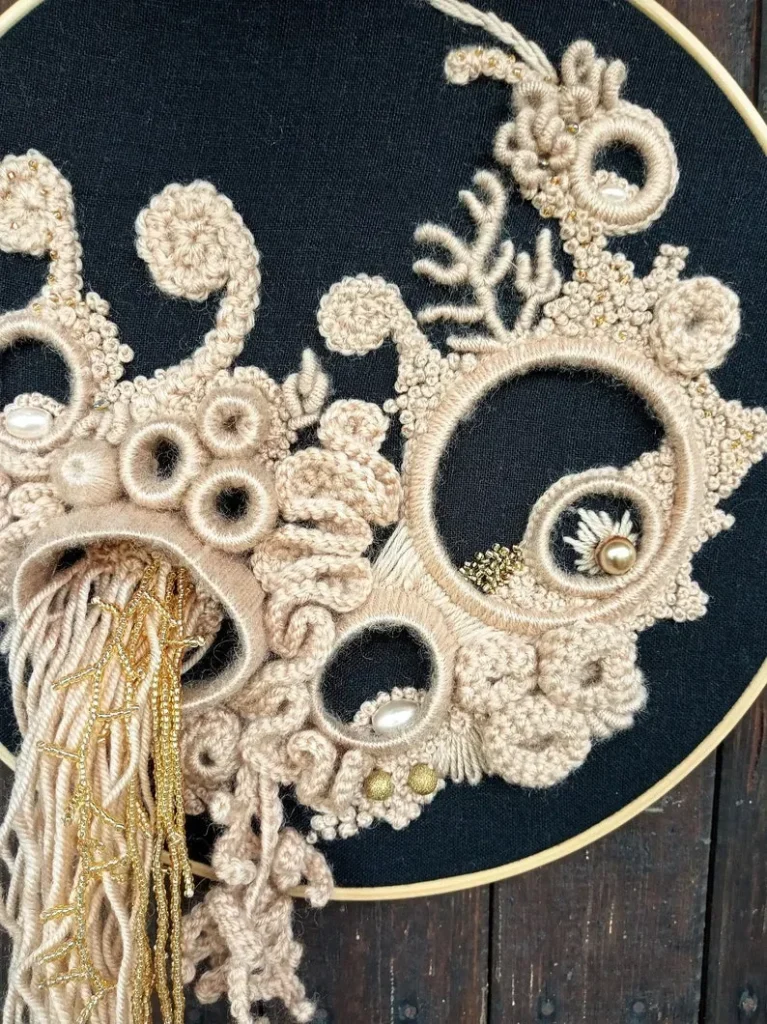
3D Embroidered Hoop Art as Textured Wall Decor: Depth, Texture, and Style
3D Embroidered Hoop Art is more than a traditional stitch project; by lifting elements from the fabric through padding and layering, you create tangible texture that reads as volumetric wall decor. When hung, these pieces act as textured wall decor that adds warmth, character, and a tactile focal point to any room. This approach blends classic embroidery with modern display aesthetics, making embroidery hoop wall decor feel fresh and contemporary.
To maximize impact, plan your composition with depth in mind. Think about which elements will sit closest to the base, where shadows will fall, and how light will reveal dimensional seams. The result is unmistakably 3D embroidery hoop art—an inviting piece that rewards close viewing and complements a variety of interior styles.
Designing Focused Themes for Impactful DIY Embroidered Hoop Art
Choosing a clear focus theme anchors your project and guides padding, layering, and color choices. Botanical motifs with layered petals, abstract geometric forms, or stylized animal silhouettes offer distinct pathways for dimensional stitching. A cohesive color palette—from soft pastels to bold jewel tones—helps your DIY embroidered hoop art harmonize with the room’s mood and lighting, while still standing out as textured wall decor.
Start with a rough layout that moves your eye around the hoop and across multiple layers. Consider how each layer interacts with lighting and how repetition of shapes or motifs creates rhythm. Thoughtful design turns embroidery hoop wall decor into a deliberate piece of art rather than a simple craft display.
Essential Materials and Tools for 3D Embroidered Hoop Art
Assemble foundational supplies: embroidery hoops in sizes such as 6, 8, and 10 inches, sturdy fabrics like cotton, linen, or canvas, and lighter layers of felt or fabric for padding. Stock a range of threads—embroidery floss, perle cotton, and decorative fibers—to build texture in 3D embroidery hoop art and elevate your textured wall decor.
Backings and structure matter for longevity. Use a strong backing fabric and consider a thin interfacing behind the base to keep the piece stable once it’s hung. Small details like fabric glue or fusible web can help secure layers during assembly, ensuring your embroidery hoop wall decor remains neat and durable.
Techniques to Build Dimension: Layering, Padding, and Stitches
Depth begins with layered applique: cut shapes slightly larger than their stitched outlines and stack them in stages, securing each layer with minimal stitching or light adhesive. Each successive layer adds incremental depth, enhancing the 3D feel of the piece.
Next, introduce raised stitches and padding shapes to lift elements away from the base. Use padded petals, foam, or batting, and apply thicker threads or multiple passes for pronounced contour. Finish with textural stitches like couching, French knots, or small beaded accents to enrich the surface and give your embroidery hoop art a tactile, gallery-worthy finish.
Display, Care, and Longevity of Embroidery Hoop Wall Decor
Displaying textured wall decor is about intentional arrangement. Hang pieces directly on the wall with sturdy hooks, or create a staggered multi-hoop display to emphasize depth. Consistent spacing and alignment across a grouped installation helps your embroidery hoop wall decor feel cohesive and curated.
Caring for these pieces protects color and structure. Keep them away from direct sunlight and high humidity to prevent fading and fiber distortion. Dust gently with a soft brush, and periodically check padding and stitches to maintain the dimensional look and integrity of the work.
Beginner-Friendly Tips for Creating Stunning DIY Embroidered Hoop Art
If you’re new to this medium, start with small swatches that focus on padding and layered shapes before attempting a full 3D piece. Practicing on fabric scraps helps you build confidence with the technique involved in DIY embroidered hoop art and reduces the risk of waste.
Be mindful of common pitfalls: avoid over-tightening the hoop, which can distort the fabric; keep padding thickness even to prevent uneven depth reads; and choose color values that complement your room’s lighting. With patient practice, you’ll develop the skills to craft embroidery hoop wall decor that feels polished and personal.
Frequently Asked Questions
What is 3D Embroidered Hoop Art and how does it differ from traditional embroidery?
3D Embroidered Hoop Art refers to embroidery that rises from the fabric and out of the hoop, creating a three-dimensional effect. It uses layering, padding, and varied stitches to add depth, turning a simple hoop into textured wall decor. Unlike flat embroidery, this approach emphasizes tactile and visual texture, making it a standout option for embroidery hoop wall decor in homes and studios.
How should I plan a design for 3D embroidery hoop art to maximize its impact as textured wall decor?
Begin with a clear theme and color palette, sketch a layout, and map where layers and padding will go. Consider how depth reads from different angles and how the hoop frame influences balance. Plan the sequence of layering so the final piece reads well as textured wall decor when hung.
What materials and tools do I need for creating DIY embroidered hoop art?
Key supplies include embroidery hoops (6-inch, 8-inch, and 10-inch), a sturdy base fabric such as cotton or linen, and padding materials like batting, foam, or felt. Gather embroidery floss or perle cotton, sharp embroidery needles and a beading needle, scissors, fabric glue or fusible web, and a marker for transferring designs; optional embellishments include beads, sequins, or metallic threads.
Which stitching techniques create depth in 3D Embroidered Hoop Art and how are they applied for embroidery hoop wall decor?
Use layered applique to build up shapes, raised stitches with padding to lift elements, and French knots or beadwork for texture. Add padding shapes from felt or batting and employ textural stitches like chain stitch and couching to enhance dimensional reads. Together, these techniques yield a strong 3D presence appropriate for embroidery hoop wall decor.
How do I display and care for 3D Embroidered Hoop Art as textured wall decor?
Mount hoops securely on the wall using a simple hook or small wall mount for a clean presentation. Protect from direct sunlight and high humidity to preserve fibers, and dust gently with a soft brush. If you display multiple hoops, ensure even spacing and alignment to maintain a cohesive textured wall decor look.
What beginner tips or pitfalls should I know when making DIY embroidered hoop art?
Start simple and practice on scrap fabric before tackling a layered piece. Avoid over-tightening the hoop to prevent distortion, and aim for padding with even thickness for consistent depth. Test stitches on your chosen fabrics to gauge how colors and textures read under your lighting, ensuring your DIY embroidered hoop art stays true to your vision.
| Aspect | Key Points |
|---|---|
| Definition | 3D Embroidered Hoop Art blends traditional embroidery with layering and padding to create texture and depth for wall decor. |
| 3D Effect and How It’s Achieved | The 3D look is built by layering fabrics, padding shapes, and using raised stitches; planning the composition ensures depth reads clearly when hung. |
| Focus Theme & Design | Popular themes include botanical motifs, abstract geometric forms, and stylized portraits or silhouettes; color palettes influence mood. |
| Materials and Tools | Hoops (6″, 8″, 10″), sturdy base fabrics (cotton/linen/canvas), batting/felt, embroidery threads, needles, scissors, glue or fusible web, and markers; optional beads or metallic threads. |
| Practical Tips for Materials | Use a lighter foundation, add a backing fabric, consider a thin interfacing for shape, and test stitches on scrap fabric. |
| Stitching Techniques for Dimension | Layered applique, raised stitches, French knots and beadwork, padding shapes, and textural stitches like chain, detached chain, and couching. |
| Designing Your 3D Embroidered Hoop Art | Start with a rough sketch, aim for balance and rhythm, and plan how layers interact with the hoop’s frame. |
| Step-by-Step: Concept to Finished Hoop Art | 1) Plan materials 2) Prepare fabric 3) Create base layer 4) Build raised elements 5) Add dimensional stitches 6) Integrate details 7) Finalize 8) Mount and display. |
| Incorporating Related Keywords (SEO) | Use terms like 3D embroidery hoop art, textured wall decor ideas, DIY embroidered hoop art, and embroidery hoop wall decor to improve discoverability. |
| Design Ideas & Style Inspiration | Botanical Tapestry, Abstract Wave, Minimalist Monochrome, Whimsical Portrait. |
| Care & Display Tips | Keep away from direct sunlight and humidity; dust gently; space multi-hoop installations evenly for a cohesive look. |
| Beginners & Common Pitfalls | Start simple, consider lighting in your room, avoid over-tightening the hoop, and ensure padding is even for consistent depth. |
| Inspiration & Community | Online communities and local groups share layering sequences, stitch techniques, color palettes, and finishing tips to inspire and learn. |
Summary
3D Embroidered Hoop Art is a dynamic fusion of textile craft and interior design, transforming simple hoops into textured wall decor that adds depth, warmth, and personality to any space. By planning your design, selecting the right materials, and combining layering with dimensional stitches, you can achieve a professional-looking piece that captivates viewers and enhances your home. This approach offers endless opportunities for creativity across living rooms, bedrooms, studios, and galleries, making 3D Embroidered Hoop Art a rewarding and enduring art form.