
3D embroidered patches have surged in popularity across jackets, backpacks, hats, and gear, thanks to their raised texture and tactile depth that bring designs to life. They fuse the artistry of traditional embroidery with a three-dimensional puff that catches light and attention, giving logos and symbols a premium feel. Whether you’re customizing a school bag or a denim jacket, this guide helps you decide between the timeless appeal of sewing 3D patches and the convenience of iron-on patches. You’ll also discover practical patch attachment tips to help ensure durability through wear and washing. By the end, you’ll feel confident about applying 3D patches with the right method for your fabric, project, and care routine.
LSI-friendly language expands how this topic is understood, using related terms such as raised embroidery badges, puff patches, and dimensional appliqués to capture search intent. In practice, designers describe textured patches, padding-backed embroidery, or applique badges to convey depth without relying on a single product name. Understanding these terms supports better content discovery and helps align guidance with backing options, stitch density, and durable finishes for different fabrics. In short, the core idea remains a fabric accent that adds depth and personality, whether it’s sewn on, bonded, or applied with a temporary adhesive.
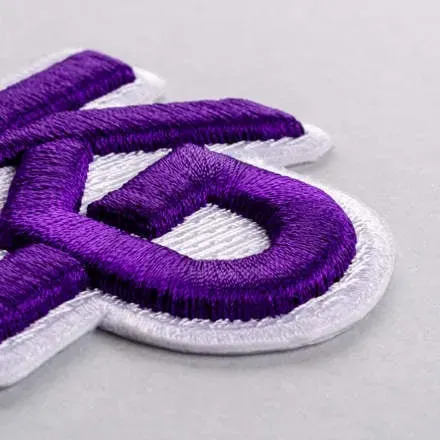
Understanding the Allure of 3D Embroidered Patches
3D embroidered patches bring designs to life with raised texture, tactile depth, and a subtle sheen that catches light from different angles. The puff under the embroidery—whether foam or padding—creates actual depth, making lettering and imagery feel tangible rather than flat.
Because of this dimensional effect, 3D patches read as premium branding on jackets, backpacks, hats, and gear. They pair well with club insignias, sports logos, and personal identities, turning simple fabric into a bold statement piece.
Sewing vs Iron-On: Choosing the Best Route for Your Patch
For projects that need long-term wear and frequent washing, sewing 3D patches provides the strongest attachment. Hand sewing or using a sewing machine with a tight satin or backstitch around the edge keeps the puff intact and minimizes edge fraying.
Iron-on patches offer speed and convenience for quick customization, but they require fabric compatibility and careful application to prevent peeling. When deciding between methods, consider fabric type, care instructions, and how often the item will be washed.
Sewing 3D Patches: A Step-by-Step Approach
To sew 3D patches effectively, gather a sharp needle suited to the fabric, strong polyester or cotton thread, scissors, and a backing stabilizer if the fabric is lightweight or stretchy. This preparation helps ensure the patch attaches firmly without crushing the puff.
Position the patch, secure it with pins or temporary adhesive, then stitch around the edge with a tight backstitch or satin stitch. After finishing, trim loose threads, press gently with a low heat iron placed over a protective cloth, and test the bond with a wash to confirm durability. These steps illustrate reliable patch attachment tips for long-lasting results.
Iron-On Patches: Quick, Clean, and Durable
Iron-on patches bond quickly when you follow heat guidelines. Prepare the fabric, preheat the iron to a cotton or poly blend setting, and protect the patch with a thin cloth or parchment paper before pressing.
Press firmly for the recommended time, let the patch cool completely, and then test the bond. Wait 24 hours before washing, and turn the garment inside out to minimize friction. Iron-on patches are ideal for fast customization or projects where sewing is challenging, especially when applying 3D patches to delicate fabrics.
Attachment Tips for Longevity: Hybrid Methods and Backing Options
Across both sewing and iron-on methods, practical patch attachment tips focus on durability. For heavy-use items, consider a hybrid approach by sewing the edges after an initial iron bond to lock the patch in place.
Choose backing options such as a lightweight stabilizer, tear-away backing, or fusible backing to reduce fabric distortion and improve edge control. Always align patches with the fabric grain and test with a wash to verify that edges stay secure over time.
Care, Maintenance, and Troubleshooting for Longevity
To keep 3D embroidered patches looking fresh, wash garments inside out on a gentle cycle, use mild detergents, and avoid harsh fabric softeners that could weaken adhesive bonds. Air dry when possible and keep heat away from the patch.
If you notice curling, edge lift, or reduced puff after washing, re-sew or re-bond the patch, or switch to a patch with stiffer padding or denser satin stitching. Always follow manufacturer care instructions and consider a small test area when trying a new fabric or backing to ensure reliable results when applying 3D patches.
Frequently Asked Questions
What are 3D embroidered patches and how do they differ from flat embroidery?
3D embroidered patches feature a raised puff created by padding or foam under the embroidery, delivering depth and a tactile feel that flat embroidery lacks. Their texture and subtle light refractions make designs stand out on jackets, bags, and hats. Key factors for durability include tight embroidery, appropriate padding, and a sturdy backing. They are popular for club insignias, sports logos, and personal branding, and can be attached by sewing or ironing depending on the project and fabric.
What are best practices for sewing 3D patches onto fabric?
To sew 3D patches, gather a sharp needle, strong thread in a matching color, scissors, and optional stabilizer. Position the patch, stabilize the fabric, and stitch around the edge with a tight backstitch or satin stitch. For dense patches, use a longer stitch length to reduce thread breakage. Trim loose threads, press gently with a low-heat iron (shield the patch), and test with a wash to ensure the edges stay secure.
Are iron-on patches suitable for 3D embroidered patches, and how do you apply 3D patches using heat?
Iron-on patches can be an efficient option for 3D embroidered patches when speed matters. Prepare a clean, smooth fabric, preheat the iron, and protect the patch with a thin cloth or parchment. Press firmly for 15–30 seconds without moving the iron, then check the bond and repeat if needed. Let the patch cool completely before washing. This method works best on sturdy fabrics; for delicate materials, test first and consider alternative attachment methods.
What are patch attachment tips for 3D embroidered patches to maximize durability?
Patch attachment tips include using a hybrid approach on heavy-use items (sew after ironing for extra security), applying a backing stabilizer to reduce distortion, aligning patches with the fabric grain, trimming edges cleanly, and testing the finished piece with a wash. Also consider backing options if stitching through the patch border isn’t feasible, and always follow care instructions to preserve the puff.
How to apply 3D patches to different fabrics and what should you consider?
Applying 3D patches varies by fabric. Denim and canvas take well to both sewing and iron-on methods, while knits or lightweight cottons may require stabilization to prevent puckering. For hats, account for curvature and height; use pins or stabilizers to keep edges even. Position patches to avoid snagging and consider light topstitching around the edge if the design allows.
What common issues occur with 3D embroidered patches and how can you troubleshoot them?
Common issues include curling at the edges after washing, compression of the puff, or adhesion failure on iron-on patches. Troubleshoot by restitching the border, choosing a stiffer padding or a heavier satin stitch, ensuring fabric compatibility with heat-activated backing, and performing a test wash. Always follow the manufacturer’s care instructions and avoid direct heat on the puff.
| Topic | Key Points |
|---|---|
| What are 3D embroidered patches? | Raised, dimensional effect created by padding/foam; provides depth and tactile interest; popular for club insignias, sports logos, and personal branding; edge finished with dense satin stitch; backing supports durability. |
| Key components | Padding/foam, dense embroidery, and a backing; the raised puff is achieved with padding and/or light foam; edge finished to hold the patch together. |
| Sewing options | Can be sewn by hand or with a machine; overview includes gathering supplies, positioning, stabilizing, stitching around the edge, trimming, finishing, and testing for security. |
| Iron-On patches | Offer fast attachment via heat-activated backing; steps include fabric prep, ironing temperature, protection for embroidery, pressing, testing bond, and letting cool before handling. |
| Attachment tips | Hybrid approaches can increase durability; use backing stabilizers; align with fabric grain; trim edges; perform wash tests; consider backing options for fabrics that care about stiffness. |
| Fabric guidance | Denim/canvas yield strong results; knits or lightweight cottons may pucker; stabilizers aid; hats require consideration of curvature; placement on bags/outerwear should minimize wear. |
| Troubleshooting | Curling edges or puff compression can be addressed by re-stitching, adjusting padding, or choosing a heavier satin stitch; ensure iron-on compatibility and follow care instructions. |
| Design & placement | Patch design should complement garment colors; size should suit surface area; placement varies by item (larger on jackets, clusters on hats/bags); consider thread colors, padding density, and backing. |
| Care & maintenance | Wash inside out on gentle cycles; mild detergents; avoid harsh fabric softeners; air-dry when possible; avoid direct ironing over patch; test care and adjust as needed. |
| Conclusion | Durable, textured embellishments, 3D embroidered patches offer expressive options for jackets, backpacks, hats, and gear. Whether sewn for longevity or ironed on for speed, proper attachment and care ensure patches stay vibrant and intact over time. |
Summary
Conclusion
3D embroidered patches offer a compelling blend of texture, color, and personality for any item. Whether you prefer sewing 3D patches for maximum durability or using iron-on options for speed, there are reliable methods to attach patches that align with your fabric and care routines. By understanding the unique features of 3D patches, following a clear sewing or ironing process, and applying smart patch attachment tips, you can enjoy durable, eye-catching patches on clothing, bags, hats, and gear. With thoughtful placement and proper care, your 3D embroidered patches will become a signature detail that reflects your style and craftsmanship for years.