
3D embroidery techniques bring depth to fabric and make designs pop with texture, inviting you to explore dimension, layering, and light-catching stitches that transform ordinary fabric into tactile art. This beginner-friendly overview explains what these techniques are, how to do 3D embroidery in simple steps, and how to practice safely at home with common tools and clear pattern planning. You’ll dive into 3D embroidery stitches, padding methods, and practical tips for selecting the best fabrics for 3D embroidery, plus guidance on tension, height, and finishing to keep edges neat. The guide also points to a puff embroidery tutorial and other approachable projects that build confidence, helping you experiment with color, texture, and proportion without overwhelming you. By the end, you’ll have a clear method for adding raised elements to your projects and a solid foundation you can build on with more complex ideas, while enjoying the creative process today.
In plain terms, this approach adds dimensional relief to fabric by layering padding behind the stitch line. Alternative terms you may encounter include raised embroidery, dimensional stitching, and puffed motifs that lift the design off the surface. You can think of it as padding-based stitching or sculpted embroidery, where height, texture, and balance determine the final look. LSI principles suggest pairing related ideas like fabric stabilization, layer height, and decorative forms to reinforce semantic relevance in your content. Starting with simple shapes such as flowers or leaves helps you practice tension and height while building a foundation for more complex pieces.
Getting Started with [3D embroidery techniques] for Beginners
3D embroidery techniques describe a family of methods that create raised or layered elements on fabric, introducing texture and dimension to your projects. For beginners, this approach feels approachable and builds confidence as you explore what these techniques can add to simple designs. This aligns with the idea of 3D embroidery techniques for beginners, where you learn to plan, padding, and finish without overwhelm.
To start your journey, consider how to do 3D embroidery in small steps. Focus on selecting a design, gathering basic tools, and experimenting with padding behind the stitches. Understanding the concept of height and layering helps you approach more complex ideas later, and it lays a clear foundation for how to do 3D embroidery at home.
How to Do 3D Embroidery: Step-by-Step Insights
A practical guide to how to do 3D embroidery begins with outlining a shape, then adding padding behind the line to create lift. This workflow helps you control height and density, ensuring the raised areas stay secure and neat. By thinking in layers, you’ll get closer to mastering the core concept of 3D embroidery techniques for beginners.
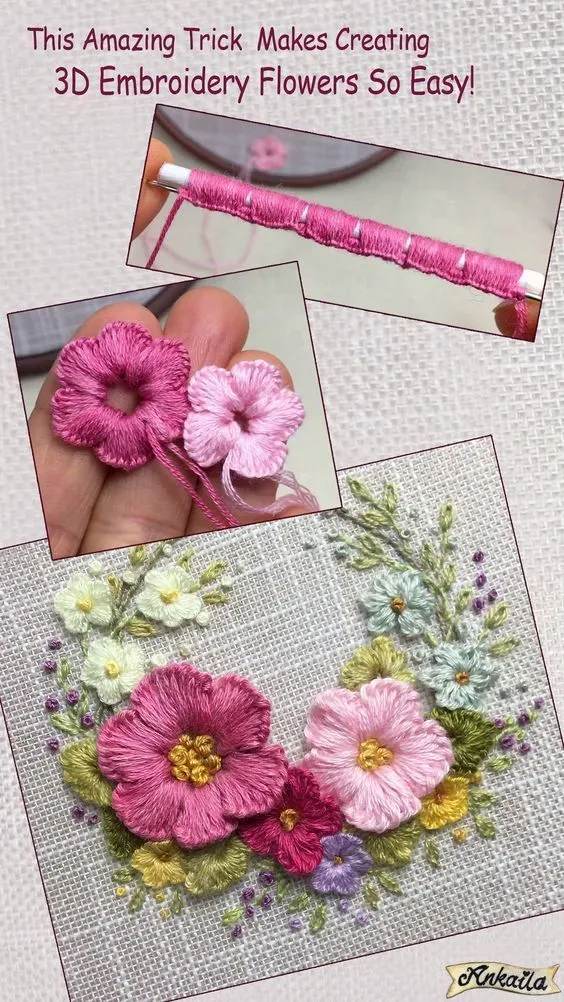
With padding in place, you then cover the form with satin stitches or long-and-short stitches to shape the final surface. Practicing on simple motifs like a flower or leaf allows you to observe how tensions interact with padding height, which is essential when learning 3D embroidery stitches and how to keep edges clean while maintaining a soft, dimensional look.
3D Embroidery Stitches: Core Techniques for Height and Texture
3D embroidery stitches are the building blocks that create depth when used with padding. These stitches must work in harmony with behind-the-scene materials to achieve a consistent, raised effect from all angles. Understanding this relationship helps explain why certain stitches perform better in 3D work and how to plan padding accordingly.
Exploring common stitches such as stem, satin, and running stitches reveals how each interacts with padding to form a cohesive raised design. As you practice, you’ll notice how stitch length, density, and the amount of padding influence the final look, reinforcing why “3D embroidery stitches” are so central to achieving a polished raised surface.
Puff Embroidery Tutorial: Creating Soft, Elevated Design Elements
A puff embroidery tutorial often centers on controlling padding height to push stitches forward and produce a rounded, soft shape. This method highlights how padding behind the stitch can dramatically alter the silhouette and create a plush, toy-like texture on fabric.
In practice, you’ll learn how to layer padding and use dense satin stitches to perfectly wrap the padded area. The result is a tangible, dimensional motif that demonstrates the puff embroidery effect at its best, showcasing how to balance height, coverage, and edge definition for striking results.
Choosing Fabrics and Stabilizers: Best Practices for 3D Embroidery
Selecting fabrics and stabilizers is crucial for successful 3D embroidery techniques. Different fabrics respond to padding height and stitch density in unique ways, which ties into the topic of best fabrics for 3D embroidery. A stable base helps you maintain tension and height without excessive bulk.
This section also highlights testing ideas on scrap fabric to understand how fabric weight, nap, and stabilizers interact with padding. By trying tear-away and cut-away stabilizers together, you can find the right balance that supports your raised elements while keeping edges clean and the design secure.
Simple Starter Project: A 3D Flower Patch and Beyond
Starting with a simple beginner project such as a 3D flower patch gives you a practical entry into the world of 3D embroidery techniques for beginners. You can practice padding, shaping, and completing the piece in manageable steps, reinforcing the core workflow without becoming overwhelmed.
As you finish this project, you’ll observe how padding height influences the final look and how to plan future shapes using a pad-and-stitch method. This foundation sets you up to tackle more ambitious designs and continues the journey into more advanced 3D embroidery ideas and techniques.
Frequently Asked Questions
What are 3D embroidery techniques for beginners and how do they add depth?
3D embroidery techniques for beginners describe methods that raise elements from fabric using padding behind stitches to create height. They combine padding like foam or batting with outlines, then finish with satin or long-and-short stitches to form a raised motif. This approach helps keep stitches neat and height consistent as you learn.
How to do 3D embroidery: a beginner’s step-by-step guide?
To do 3D embroidery: start with a simple design, secure the fabric in a hoop, and transfer the pattern. Outline the shape, add padding behind, and then cover with dense satin or long-and-short stitches to create a puffed effect. Practice on scraps first to dial in padding height and tension.
Which 3D embroidery stitches are most common in a puff embroidery tutorial?
Common 3D embroidery stitches include outlining with running or stem stitches, then filling with satin stitches over padding to create a raised surface. The height comes from padding behind the stitches, so adjust layers to control the puff. Following a puff embroidery tutorial style approach helps keep the technique consistent.
What are the best fabrics for 3D embroidery and how should you choose stabilizers?
Best fabrics for 3D embroidery are typically medium-weight cotton, linen, or felt, which provide stability without too much bulk. Pair with stabilizers such as tear-away or cut-away, and consider a water-soluble stabilizer on top for clean edges. Test on scrap fabric to see how thickness and stabilizers interact before working on your final piece.
Where can I find a puff embroidery tutorial for beginners and what supplies do I need?
A puff embroidery tutorial for beginners will guide you through padding behind stitches, using foam or batting for height, and finishing with dense satin stitches. Essential supplies include a sharp embroidery needle, a sturdy hoop, quality threads, padding material, and a stabilizer suitable for your project.
What is a simple beginner project to practice 3D embroidery stitches and padding?
A simple beginner project to practice 3D embroidery stitches and padding is a 3D flower patch. Start by outlining the petals, hoop the fabric, add padding behind the shape, and finish with short dense satin stitches to create a raised effect. This small study helps you learn padding height and how it shapes the final design.
| Section | Key Points |
|---|---|
| What are 3D embroidery techniques | Family of methods creating raised or layered elements on fabric; uses padding foam, batting or soft stuffing behind stitches; adds height and dimensionality; results resemble flowers, leaves, or decorative shapes; beginners should plan designs, gather materials, and apply padding with neat, secure stitching. |
| Tools and materials | Needle, hoop/frame, embroidery threads, suitable fabric; padding options (foam, batting, felt); stabilizers (tear-away, cut-away, soft water-soluble); scissors, pattern transfer tool; start with foam to judge height. |
| Choosing fabrics and stabilizers | Medium-weight fabrics like cotton, linen, or felt provide stability; nap or weave can help stitches catch; stabilizers prevent curling; tear-away and cut-away are common; soft water-soluble stabilizer can be used on top for a delicate finish; test on scrap fabric; combine stabilizers as needed. |
| Techniques you will use and how to do them | Two core approaches: padding (layer behind the design) and puff embroidery (a form pushes stitches forward). Outline the shape with a basic stitch (running or stem), add padding behind, cover with satin or long-and-short stitches, and practice with simple shapes. 3D embroidery stitches require padding to maintain a consistent look from all angles; puff embroidery centers on a padded area covered with dense stitches. |
| A simple beginner project: a 3D flower patch | Begin with tracing the design, hooping the fabric, outlining petals, inserting foam or batting behind the petals, and covering with dense satin stitches. Add center and leaves with lighter colors, trim stabilizer, and press from the back to flatten folds. This project demonstrates padding height and how it shapes the final piece. |
| Tips for success and common issues | Keep padding height consistent; recheck thread tension and keep padding flat behind stitches. Test on fabric scraps; secure thread ends to prevent unraveling; if stitches appear bulky, reduce padding or use smaller satin stitches. Start with a simple single-color design before moving to multicolor projects. |
| Project ideas and next steps | Experiment with leaves, bees, hearts, geometric shapes; combine multiple small raised elements. Explore more complex padding schemes and different fabrics/colors. Keep notes on padding height that works for certain stitches to reproduce results; seek more advanced 3D embroidery stitching tutorials to continue building your skills. |
Summary
3D embroidery techniques open a world of texture and dimension on fabric, inviting beginners to explore raised elements with confidence. This guide covers planning designs, selecting padding behind stitches, choosing fabrics and stabilizers, and practicing at home to build a solid foundation. Start with a simple project like a 3D flower patch and gradually move to more complex shapes while keeping stitches neat and secure. With patience and regular practice, you will master 3D embroidery techniques and enjoy the tactile, decorative results of your raised stitched artwork.