
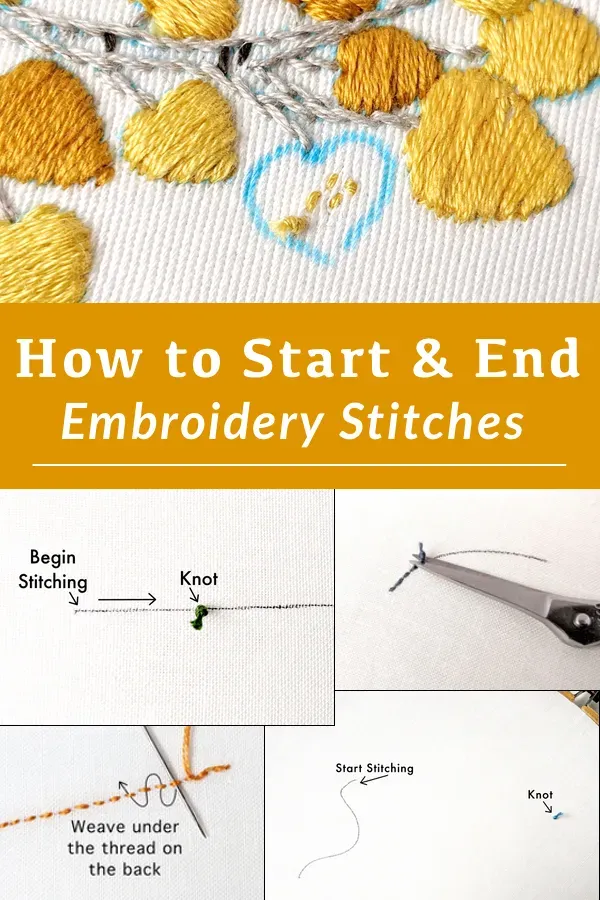
How to Start Embroidered Art is a delightful entry into textile creativity that you can begin right at home, even with a modest set of supplies and a calm workspace. This approachable hobby offers color, texture, and design without complicated equipment, making embroidery for beginners accessible to complete newcomers. From selecting simple fabrics to mastering a few basic stitches, you’ll gain confidence with each small project, building a repertoire you can expand later. Key steps include choosing a design and practicing design transfer techniques so your stitches align with your vision, whether you’re outlining a motif or filling shapes. With regular practice, you’ll progress from simple swatches to more expressive embroidered art that reflects your taste and creativity.
Beyond the term embroidery, this craft is often described as needlework or textile decoration, opening doors for beginners to express color and texture. You’ll hear terms like fabric art, hand stitching, and surface embroidery used interchangeably as you explore tools and techniques. Breathing life into cloth starts with simple motifs, patient practice, and a methodical approach to planning, transferring, and stitching. By focusing on approachable starter projects and repeating basic stitches, you lay the groundwork for more complex artwork.
How to Start Embroidered Art: Essentials for Beginners
Embroidery is a welcoming craft for people just starting out, and the right starting point is to assemble a small toolkit and a simple plan. For embroidery for beginners, begin with light- to mid-weight fabrics like cotton or linen, a stable hoop, a short color palette, and gentle needles. Having these basics on hand makes it easy to practice regularly and celebrate small wins as you learn.
To ensure you can translate your ideas to fabric smoothly, learn a few design transfer techniques before you stitch. Whether tracing with a light pencil on fabric, using transfer paper, or a lightbox method, accurate outlines help your stitches stay aligned with the intended shapes. Mastery of these transfer methods is a foundational skill in any beginner-friendly project.
Starter Embroidery Projects to Build Confidence
Starter embroidery projects provide tangible motivation and measurable progress. Try a painted fabric sampler, an alphabet or word sampler, a simple floral motif, or geometric shapes. These starter embroidery projects focus on steady tension, even stitches, and color matching, letting you experience successful outcomes quickly.
As you complete each project, you’ll gain confidence and build a base for more complex embroidery for beginners. Use the projects to practice combining hand embroidery stitches and experimenting with hue shifts, while keeping sessions short enough to stay enjoyable and consistent.
Mastering Hand Embroidery Stitches for Better Texture
Mastering hand embroidery stitches unlocks most of what you can create. Start with a core set—backstitch for clean outlines, running stitch for soft lines, split stitch for texture, satin stitch for solid fills, and stem stitch for natural curves. Each stitch has a role in shaping your embroidered art and contributing to the overall feel of a piece.
Practice these hand embroidery stitches on a swatch, then apply them to a tiny project. Focus on tension, even spacing, and the way stitches lie flat; as your muscle memory grows, you’ll be able to layer stitches and blend colors for richer textures.
Design Transfer Techniques: From Paper to Fabric with Precision
Design transfer techniques are your bridge between concept and fabric. Experiment with tracing, carbon transfer papers, lightbox tracing, and water-soluble markers to capture motifs accurately. Each method has its strengths, so choosing the right technique for your design and fabric helps you avoid mistakes as you begin to stitch.
Once outlines are in place, you can move into stitching with confidence. Keep lines light during transfer, then test on a scrap fabric to confirm visibility and wash-away properties if you’re using water-soluble pens. Understanding design transfer techniques well reduces guesswork and accelerates your progress in beginner-friendly projects.
Choosing Fabrics and Threads for Embroidery Techniques for Beginners
Choosing fabrics and threads sets the foundation for successful embroidery techniques for beginners. Natural fibers like cotton and linen are forgiving and easy to handle, while Aida cloth gives visible holes that help guide stitches. The fabric choice affects how your stitches sit, so pick a surface that matches your design’s scale and your comfort level.
Color decisions matter just as much as the stitches themselves. Start with a compact palette of 6–12 colors and practice blending shades by layering threads or combining similar tones. This approach keeps projects approachable while teaching you how to build depth without overwhelming your workspace.
From Practice to Projects: Growing Beyond the Beginner Stage
From practice to projects, growth in embroidery for beginners comes through consistent effort and curiosity. Move from basic samplers to small, themed pieces that challenge you to combine stitches and vary textures. Regular practice helps you refine tension, alignment, and color control while keeping a sense of play.
Over time you can push into more ambitious designs, such as mixed stitches, color transitions, or even working from photographs. By exploring design transfer innovations and new embroidery techniques for beginners, you’ll expand your repertoire while preserving the joy of making something with your own hands.
Frequently Asked Questions
How to Start Embroidered Art: What are the essential tools for embroidery for beginners?
For a smooth start in embroidery for beginners, gather a stable fabric (cotton or linen), a hoop to keep the fabric taut, embroidery floss in a small color palette, sharp embroidery needles, and scissors. Add simple transfer tools (pencil or water-soluble marker) to place designs accurately. Practice on a scrap swatch to build comfort with tension before your first project.
How to Start Embroidered Art: Which starter embroidery projects are best for building confidence?
Good starter projects include a painted fabric sampler, an alphabet or word sampler, a simple floral motif, and basic geometric shapes. Begin with one-stitch areas and short color blocks to develop control, aiming to complete each piece in a single practice session or two. Finishing these builds momentum for more complex designs.
How to Start Embroidered Art: What are the core hand embroidery stitches every beginner should learn?
Begin with a small set of stitches: backstitch for outlines, running stitch for texture, split stitch for a slightly textured line, satin stitch for solid fills, and stem stitch for curves. Practice each on a swatch until your tension stays even, then combine them to create simple motifs. Mastery of these stitches forms the foundation for most embroidered art pieces.
How to Start Embroidered Art: Which embroidery techniques for beginners help with texture and shading?
Focus on techniques that add depth, such as satin stitch for solid areas, split or stem stitches for shape and outline, and layered threads for gentle shading. Start with small color blocks and gradually blend tones by layering. As you gain comfort, mix stitches to create richer embroidered art.
How to Start Embroidered Art: How do you transfer a design using design transfer techniques?
Design transfer techniques include tracing with washable pencils, carbon or graphite transfer papers, the lightbox/window method, and water-soluble markers. Place the design on fabric, trace to leave a light guide, and test on a scrap before stitching. This ensures your stitches align with the intended shapes.
How to Start Embroidered Art: How do you progress from starter embroidery projects to more complex designs?
Progress from starter embroidery projects by expanding stitch variety, adding shading, and layering textures. Plan a practice schedule, expand your color palette, and study patterns you admire to inform future pieces. With consistent effort, you’ll tackle advanced stitches and larger, more intricate designs.
| Aspect | Key Points |
|---|---|
| What is embroidered art for beginners? | Embroidery blends design, color, and texture and is beginner-friendly, offering a path from simple stitches to more complex pieces. |
| Why it’s appealing for beginners? | No expensive equipment, quick sense of progress, meditative process, and scalable projects as skills grow. |
| Tools and materials you’ll need | Fabric (cotton/linen/Aida), hoop or frame, embroidery floss, needles, scissors, transfers or pencils, optional thimble; budget tips for using scrap fabric. |
| Design selection for beginners | Choose simple designs with clear shapes and short color areas; practice tracing shapes and filling with single stitches. |
| Transferring your design to fabric | Tracing on light fabrics; transfer papers; lightbox/window method; water-soluble markers. |
| Starting with basic stitches | Backstitch, Running stitch, Split stitch, Satin stitch, Stem stitch; practice each on swatches before tackling a project. |
| Your first starter embroidery projects | Painted fabric sampler, Alphabet/word sampler, Simple floral motif, Geometric shapes; designed to be achievable and build confidence. |
| Fabric and thread choices | Light to medium-weight fabrics; natural fibers; Aida for visibility; begin with 6–12 thread colors; practice blending shades. |
| Finishing and displaying embroidered art | Remove from hoop, wash and press; frame under glass or mount on canvas; protect from sunlight and humidity. |
| Overcoming common beginner challenges | Uneven stitches, slippage, color bleeding, fraying; solutions include consistent tension, proper securing, test colorfast threads. |
| Progression and practice ideas | Weekly stitch samplers, color blending exercises, themed mini-projects, design critique and revision. |
| Next steps beyond basics | Explore mixed stitches, color transitions, complex designs, and improved design transfers. |
| Care and maintenance | Dust gently, avoid direct sunlight, maintain steady humidity; hand wash cold, test colorfastness first. |
Summary
How to Start Embroidered Art is a welcoming journey into textile creativity, guiding beginners from essential tools to satisfying starter projects. This descriptive overview highlights practical steps—from choosing fabrics and organizing supplies to mastering a handful of core stitches and simple transfer methods—that build confidence and keep learning enjoyable. By progressing through small projects, exploring color combinations, and refining transfer techniques, you’ll steadily expand your repertoire and create embroidered art that reflects your personal style. With patience and curiosity, How to Start Embroidered Art becomes more than a hobby; it becomes a creative practice you can sustain for years.