
Screen printing for beginners is a hands-on craft that blends creativity with practical technique you can master with steady practice, patience, and a routine that builds muscle memory in your hands while you learn to read ink flow and press evenly. From simple T-shirts to bold posters, you’ll explore Beginner screen printing projects and DIY screen printing ideas that translate concepts into crisp, opaque ink, and if you’re curious, ‘How to screen print for beginners,’ this practical overview will guide you from setup to first successful prints, drying times, and basic color choices. You’ll learn to select a screen, emulsion, squeegee, and ink, and to set up a tiny, organized workspace with the right screen printing supplies for beginners so you can practice without overwhelm, while gradually introducing handling techniques, safety steps, and routine cleanup that keep gear in good shape. The core concepts—burning a stencil into the emulsion, pulling ink across the mesh, and mastering the ideas behind Silkscreen printing basics—are explained in clear terms so you can see progress on every print. As you build confidence, you’ll move from one-color experiments to simple two-color designs and bigger projects, all while developing a repeatable process you can rely on, document, and iterate on as you encounter new substrates and ink systems.
As an introduction from an alternative angle, consider this a stencil-based printing method where ink migrates through a woven mesh to create crisp images on fabric, paper, or other materials. Think of it as silkscreening-inspired art, with a reusable frame and an exposed design that acts as a barrier for ink, guiding where color lands. Early projects emphasize simple layers, starting with one color, practicing even pressure, and curing the print so the image endures. A focus on gear setup, inks that suit the substrate, and careful alignment helps beginners build confidence while expanding toward more complex multi-color work.
Screen printing supplies for beginners: essential setup and starter kits
Getting started in screen printing begins with selecting a lean set of screen printing supplies for beginners. A basic kit typically includes a frame, a screen with a suitable mesh count, photo emulsion, a safe exposure light, a squeegee, and water-based inks or plastisol inks depending on your substrate. You don’t need every tool upfront; a simple starter bundle can be enough to practice core steps. This approach aligns with the idea of beginner screen printing projects: small-scale, low-risk experiments that build muscle memory before you tackle complex multi-color work. Plan your first sessions around a few simple designs and practice runs on inexpensive shirts or paper to minimize waste while you learn.
Once you have the basics, set up a dedicated workspace with a dry area for curing and a clean bench for mixing inks. As you gain confidence, you can expand your toolset with additional screens of different mesh counts, extra squeegees, and specialty inks. The goal at this stage is to build a repeatable workflow where ink consistency, squeegee angle, and timing become second nature. You can explore DIY screen printing ideas, like creating a simple graphic or typography poster, to test your setup and refine your process without overloading your schedule.
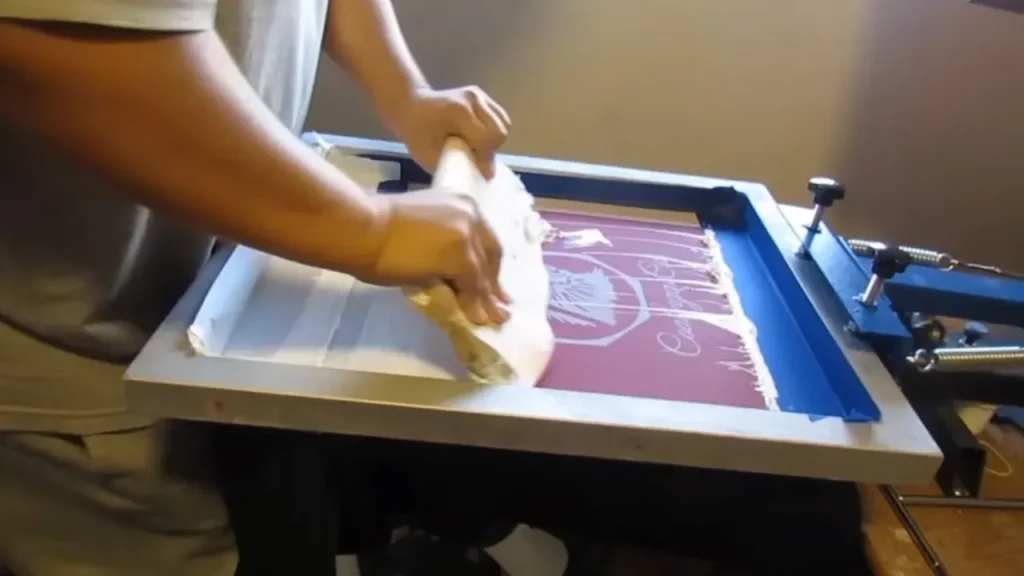
Silkscreen printing basics: from stencil to print
At its core, silkscreen printing basics involve creating a stencil on a screen and using ink to transfer that image onto a substrate. The stencil is formed by coating the screen with emulsion, then exposing it to a design, washing away the unexposed areas, and letting it dry in a dark space. When you pull ink across the screen with a squeegee, the ink passes only through the open mesh onto the surface. The process sounds simple, but the result depends on consistent squeegee pressure, proper ink viscosity, and accurate registration if you’re printing more than one color. If you’re looking for how to screen print for beginners, this overview covers the essential steps: select the right substrate, align your screen, apply a thin, even layer of ink, and cure or heat-set after printing.
In practice, you’ll learn that the choice between water-based inks for fabric and plastisols for vivid, opaque colors on textiles changes how you prepare the screen and plan the drying times. The silkscreen printing basics also include gathering the right screen printing supplies for beginners, such as mesh counts suitable for your design’s detail, a reliable exposure unit, and a clean workspace to prevent dust and fibers from interfering with the image. With patience, you’ll be able to move from basic one-color prints to more complex pieces while maintaining clean edges and consistent pressure throughout the stroke.
Beginner screen printing projects: a stepping-stone to multi-color work
Embrace a measured progression with beginner screen printing projects that emphasize fundamentals. Start with a one-color t-shirt print that features bold, simple shapes and strong contrast. This project helps you calibrate your exposure, stencil quality, ink consistency, and curing timing while reducing the risk of misregistration. After you’ve mastered the single color, you can tackle a two-color graphic on a tote bag, using registration marks to align the second color. These projects are intentionally straightforward to build confidence and create tangible results, aligning with the idea of beginner screen printing projects as a stepping stone toward more complex work.
These beginner screen printing projects offer a clear path: repeatable steps, predictable outcomes, and opportunities to experiment with ink viscosity and drying times. Use these projects to build a simple playbook for future prints, note your results, and adjust squeegee pressure and flood stroke. As you grow comfortable, you can advance to more ambitious DIY screen printing ideas such as layered textures or more colors while keeping your workflow organized.
DIY screen printing ideas for home crafts
DIY screen printing ideas are plentiful for home crafters. Start with paper posters and greeting cards, then move to textiles like tote bags or patches. Printed works can be used for gifts, small products, or decor. The feel of a hand-printed item gives a unique character compared to mass-produced prints. When exploring DIY screen printing ideas, consider simple color blocks and easily repeatable motifs that translate well across surfaces.
On surfaces, you’ll want to pick substrates with appropriate absorption and textural properties: cotton fabrics for soft hand feel, smooth posters for crisp edges. Learn to adapt ink viscosity to prevent bleeding on paper versus fabric. This is a good moment to review the screen printing supplies for beginners and adjust your kit to tackle new surfaces, such as canvas, cards, and patches.
How to screen print for beginners: mastering ink, curing, and workflow
Learn the essentials of ink choice, whether water-based or plastisol, and how viscosity affects lay-down. For beginners, test with a small amount of ink and a test swatch to gauge opacity. The workflow includes prepping the screen, applying emulsion, exposing, washing, drying, prepping the substrate, printing, and curing. The curing step is critical to durable prints, usually requiring heat to the recommended temperature for a set time. If you’re unsure, consult your ink brand’s guidelines, as curing times differ between fabrics and papers. This section ties into the broader how-to and helps novices build confidence.
With practice, you’ll begin to see patterns: print once, cure, test, and adjust. For beginners, it’s common to start with a few test runs on scrap material before moving to final pieces. Keeping a simple log of settings—mesh count, squeegee angle, ink brand, and cure temperature—helps you replicate successful results and reduces trial-and-error in future projects. This is where the beginner screen printing projects concept overlaps with your daily work.
Maintaining your screens and building a consistent practice routine
Care and maintenance keep your screens in good condition and extend their life. Rinse screens thoroughly after each use to prevent ink from drying in the emulsion. Use a gentle emulsifier or screen wash recommended by your ink brand to remove ink and residues without damaging the mesh. Let screens dry completely in a dust-free area before reclaiming or reusing them. Store frames flat and avoid bending or warping the mesh. For beginners, keeping a routine helps you stay organized and reduces the learning curve over time. The more you practice, the more natural the process becomes, which is a key part of mastering screen printing for beginners.
In addition to routine cleaning, regularly inspect the mesh for wear and the stencil for residual emulsion. Label and archive your screens so you can reproduce older designs or troubleshoot what worked well in past sessions. A simple maintenance habit—cleaning after each session, drying thoroughly, and storing in a dry, stable environment—will pay off as you tackle more ambitious projects and larger runs.
Next steps: joining communities and continuing to grow your skills
If you’re looking to expand your skills, join local maker groups or online communities that discuss screen printing for beginners. Sharing tips, project ideas, and troubleshooting strategies with others can accelerate your learning and expose you to new techniques and applications. You can also participate in workshops or take a short course focusing on basic silkscreen printing to build a strong foundation. As your confidence grows, you’ll be able to tackle more ambitious projects, such as layering multiple colors with precise registration, printing on a wider range of fabrics, or producing limited edition artist prints.
Beyond structured lessons, documenting your results and contributing to DIY screen printing ideas keeps the practice lively. Maintain a simple portfolio of your beginner screen printing projects, note the ink viscosities and curing times you used, and revisit designs to refine your workflow. By staying curious, you’ll turn screen printing for beginners into a steady, creative habit that scales from home crafts to small-batch productions.
Frequently Asked Questions
What is screen printing for beginners and how do I start?
Screen printing for beginners is a hands-on craft where you learn by doing. To start, assemble a simple kit with a screen frame, emulsion, a squeegee, a couple ink colors, and a few blank shirts or paper. The core steps are: design a stencil on the emulsion-coated screen, dry it in a dark area, expose it to light, wash out the unexposed areas, then print and cure. Focus on one-color designs to build consistency before attempting multiple colors.
What are the essential screen printing supplies for beginners?
Essential screen printing supplies for beginners include a frame with mesh, photo emulsion, an exposure light, a squeegee, ink (water-based or plastisol), and blank substrates like shirts or paper. You can start with a small screen printing supplies for beginners kit that covers these basics. As you gain experience, you can add extra screens with different mesh counts and more inks. A simple workspace with a clean drying area helps too.
What beginner screen printing projects should I start with?
For beginner screen printing projects, start with one-color prints on an easy substrate like a cotton T-shirt or white paper to master the basics. Once comfortable, graduate to basic two-color designs using simple shapes and registration marks to align layers. Practice with test swatches to dial in ink quantity and squeegee pressure, then cure the prints according to the ink spec.
What are silkscreen printing basics I should know as a beginner?
Silkscreen printing basics for beginners include the stencil concept (design burned into emulsion), making sure the screen is dry before exposure, and learning proper squeegee technique. Key technical aspects are choosing the right mesh count, controlling ink viscosity, setting the correct exposure time, and allowing adequate drying and curing times. Practice clean edge quality and alignment to improve consistency across prints.
Do you have DIY screen printing ideas for beginners to try at home?
DIY screen printing ideas for beginners can be tackled with simple, bold designs. Try one-color T‑shirt prints, a two-color graphic on a tote bag, bold paper posters, or small greeting cards or patches. Each project emphasizes solid color blocks and basic alignment, enabling you to learn ink flow, curing, and edge definition with minimal gear.
What tips help screen printing for beginners improve accuracy and reduce smudging?
To improve accuracy and reduce smudges in screen printing for beginners, start with a simple design and single color to build confidence, maintain consistent ink amounts and squeegee pressure, and perform test prints before final runs. Keep a tidy workspace with a dedicated area for mixing inks and drying prints, and document curing times, screen mesh counts, and squeegee angles. With practice, higher color registrations and cleaner edges will come naturally.
| Key Point | Description | Tips / Notes |
|---|---|---|
| Overview | Screen printing for beginners blends creativity with a hands‑on process you can master with practice, ideal for bold posters, custom t‑shirts, and tote bags with crisp ink. | |
| Core setup | Screen frame, photo‑emulsion coated mesh, exposure lighting, squeegee, and ink (water‑based or plastisol) depending on substrate. Start with a simple kit: frame, emulsion, basic squeegee, a couple inks, blank shirts or paper. | As you gain experience, you can add inks, extra screens with different mesh counts, and more complex design tools. |
| How it works | A design is burned into the emulsion on the screen to create a stencil; ink is pulled through the open mesh with a squeegee onto the substrate. Success relies on consistent pressure, even ink spreading, and proper drying times. | |
| First projects | Begin with one‑color prints on cotton shirts or white matte paper; then progress to basic multi‑color work using registration marks and alignment tricks. | Goal is steady improvement and workflow, not perfect color from the start. |
| Practical workflow | Build a small, repeatable process: design a simple graphic, apply emulsion, dry in a dark room, expose, wash to reveal stencil, print test swatch, then final product. Repeat to improve setup time and line quality. | |
| Step‑by‑step projects | Four beginner‑friendly projects covering essential skills: 1) One‑color t‑shirt 2) Two‑color tote bag 3) Paper posters with bold shapes 4) Greeting cards or patches | Each project emphasizes core techniques and ink handling. |
| Inks & substrates | Choose ink based on substrate: water‑based for soft feel on fabrics; plastisol for opaque color on textiles. Learn prep and curing basics. | Silkscreen basics: mesh counts, squeegee durometers, open‑area vs full‑coverage prints. |
| Tips for success | Start simple, keep a clean workspace, test print before final substrate, and document steps and settings. | |
| Common challenges | Alignment, opacity, curing; troubleshoot by adjusting ink viscosity, surface cleanliness, exposure time, and washout efficiency. Regular maintenance extends gear life. | |
| Care & maintenance | Rinse, use emulsifier/screen wash, dry screens completely, store frames flat to avoid warping, maintain a routine. | |
| Learning & community | Join local maker groups or online communities and consider workshops to accelerate learning and discover new techniques. |
Summary
Conclusion. Screen printing for beginners is a practical and expressive craft that can evolve with your interest and time. By starting with simple supplies, a well‑defined workflow, and a few clear Step‑by‑step project ideas, you’ll build a solid foundation that supports more complex designs later. Keep experimenting, stay curious, and document your results so you can track what works best for your materials and design goals. With patience and practice, you’ll turn your screen printing for beginners into a rewarding, consistent creative process that yields high‑quality prints and new opportunities for personal or small‑business projects.